はじめに
OpenShift 4 では、そのクラスタの構成方法に IPI(Installer-Provisioned Infrastructure)と UPI(User-Provisioned Infrastructure) の二種類があります。
これまで、IPI をサポートするプラットフォームは AWS や Azure、GCP、RHV、vSphere などのパブリッククラウドやオンプレミスの仮想化基盤に限定されていましたが、どうやら先月末にリリースされた OpenShift 4.6 で、ベアメタル環境への IPI インストールが公式にサポートされたようです。
In 4.6, the full stack automation installation of OpenShift on bare metal is generally available.
Red Hat OpenShift 4.6 Is Now Available
これまでも、GitHub 上では ベアメタル IPI の情報は公開 されており、以前も VirtualBMC for vSphere のユースケースとしても実際に 4.5 で動作を確認済み でした。
とはいえ、せっかく公式手順に仲間入りしたので、このエントリでは、OpenShift 4.6 で公式にサポートされたベアメタル IPI インストールの方法を、改めて紹介します。ただし、BMC を積んだ物理サーバが潤沢にあるわけではないので、物理サーバは VirtualBMC for vSphere を使った vSphere 環境の仮想マシンで代替します。
なお、今回紹介する手順は OKD でなく OpenShift のものです。インストールすると Red Hat OpenShift Cluster Manager に登録され、60 日間の評価期間 が始まります。
手順の概要
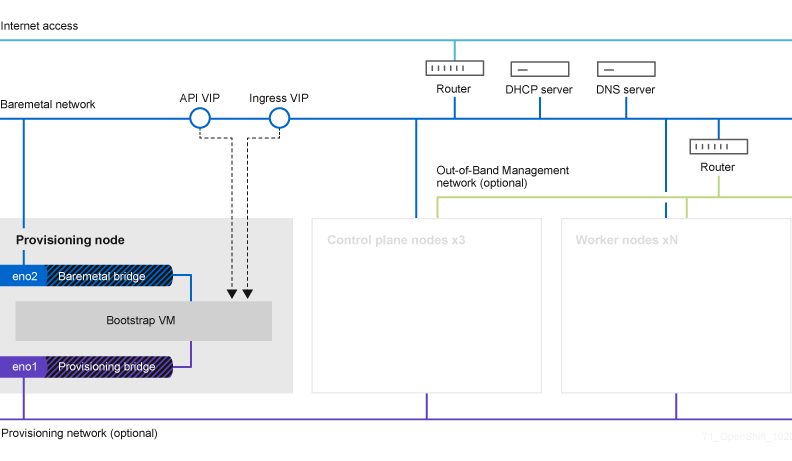
公式の手順を参考に進めます。IPI インストールといえどクラスタ外に本当に何も要らないわけではなく、外部との接続点になるルータ、DHCP サーバ、DNS サーバは必要です。また、物理サーバを自動制御するため、各物理サーバの BMC へも到達できる必要があります。
インストールの流れ
インストールの中では、最初にブートストラップ VM が構成されて起動されます。この後、コントロールプレーンノードの BMC が制御され、ブートストラップ VM を使って PXE ブートと OS の導入、初期構成が行われます。この段階で一時的にブートストラップ VM が Kubernetes のコントロールプレーンとして振舞うようになり、これを使ってコントロールプレーンノード上にマネジメントクラスタが構成されます。
Overview – Deploying installer-provisioned clusters on bare metal | Installing | OpenShift Container Platform 4.6
この後、ブートストラップ VM からコントロールプレーンの機能がマネジメントクラスタに移譲され、ブートストラップ VM は削除されます。後続のワーカノードのプロビジョニングはマネジメントクラスタを使って行われます。
Overview – Deploying installer-provisioned clusters on bare metal | Installing | OpenShift Container Platform 4.6
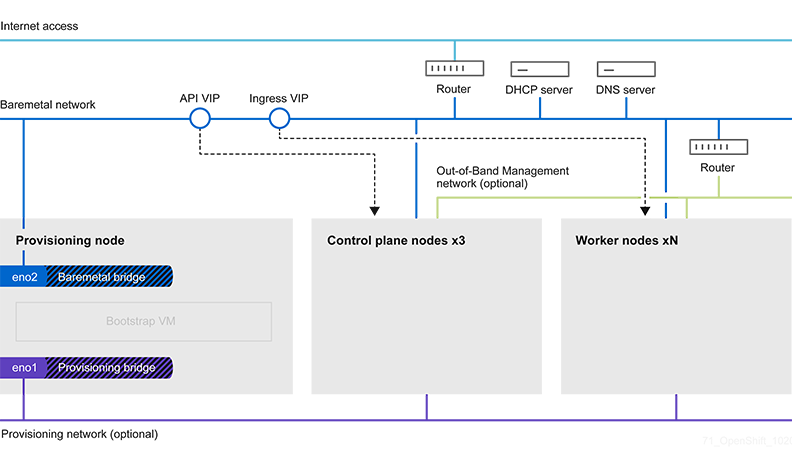
ブートストラップクラスタを用いて Kubernetes のクラスタそれ自体をプロビジョニングしていく流れは、Kubernetes の Cluster API のそれとよく似ていますね。
今回の構成
さて、公式には前述の通りの構成ですが、今回はラボ向けに簡略化して次の図の通りに構成します。といっても、きちんとマルチノードには構成します。
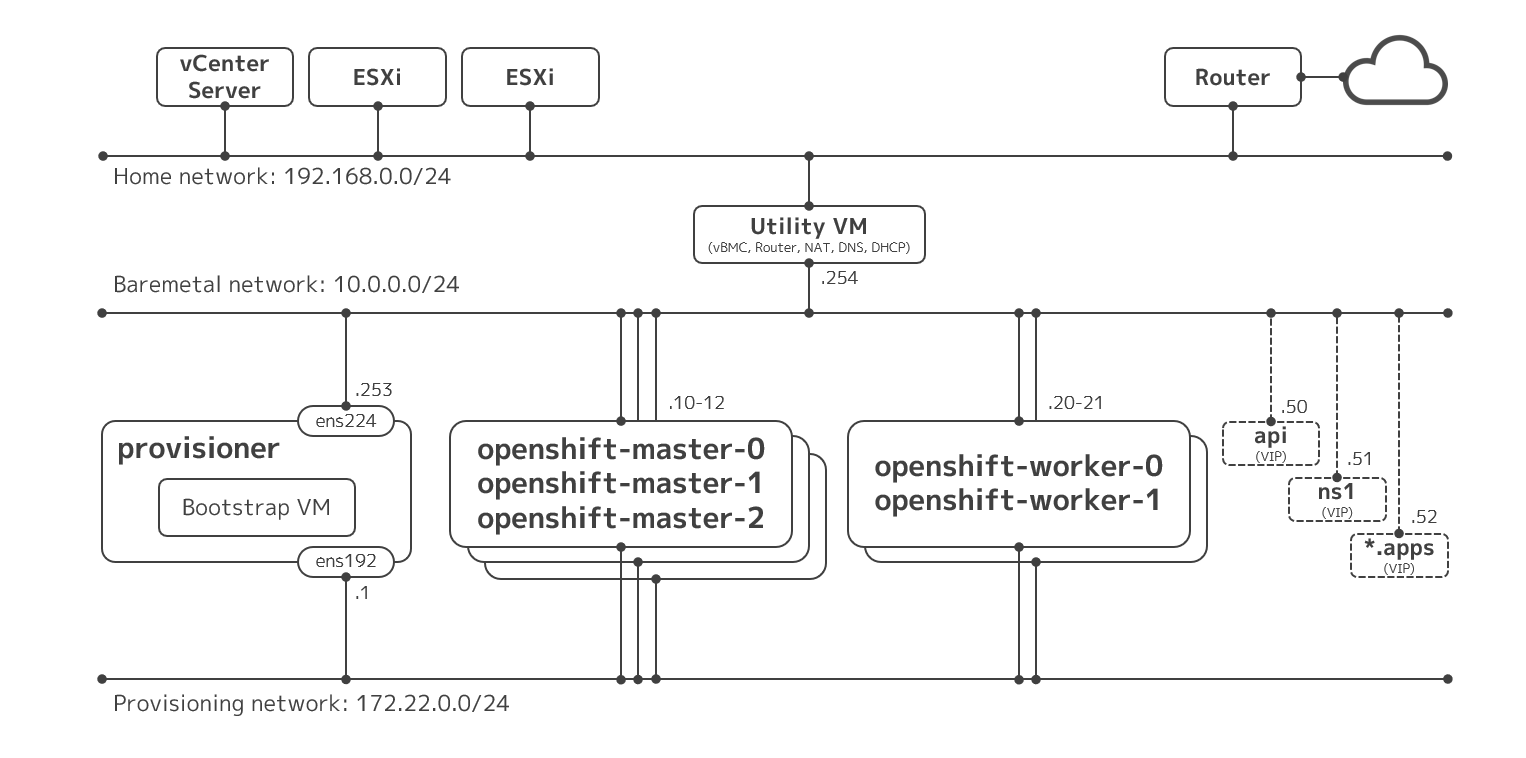
ポイントは次の三点です。
- クラスタ外に必要なルータ、DHCP サーバ、DNS サーバの機能は、仮想マシン(図中のユーティリティ VM)にサービスさせる
- プロビジョニングノード、マスタノード、ワーカノードはすべて vSphere 環境の仮想マシンとして用意する
- vSphere 環境の仮想マシンを物理サーバとして振舞わせるため、ユーティリティ VM に VirtualBMC for vSphere を導入し、仮想マシンごとに仮想 BMC を構成する
準備
インストールの前提として、物理サーバ(に相当する仮想マシン)や周辺環境を用意します。
物理サーバに相当する仮想マシンの作成
構成先となる物理サーバに相当するモノとして、vSphere 環境上に仮想マシンを用意します。
| 役割 | vCPU | メモリ | ディスク | NIC #1 | NIC #2 |
| マスタノード #1 | 4 | 16 GB | 128 GB | Provisioning | Baremetal |
| マスタノード #2 | 4 | 16 GB | 128 GB | Provisioning | Baremetal |
| マスタノード #3 | 4 | 16 GB | 128 GB | Provisioning | Baremetal |
| ワーカノード #1 | 4 | 16 GB | 128 GB | Provisioning | Baremetal |
| ワーカノード #2 | 4 | 16 GB | 128 GB | Provisioning | Baremetal |
| プロビジョニング | 4 | 16 GB | 128 GB | Provisioning | Baremetal |
上記の仮想マシンは、ファームウェアに BIOS を指定しておきます。これは VirtualBMC for vSphere の都合なので、ホントに物理サーバで実施するときにはこの必要はありません。ドキュメントからはプロビジョニングネットワークに IPv6 を使う場合は UEFI でないとダメなように読み取れますが、今回は IPv4 を利用するのでヨシとします。
また、プロビジョニング用 VM では、後続の手順で libvirt を動作させるため、ハードウェア仮想化をゲストに公開する構成にしておきます。
なお、プロビジョニング用 VM を除き、各ノードの OS は IPI インストールの手順の中で自動でインストールされるため、手動での導入は不要です。プロビジョニング用 VM の OS インストールは後続の手順で行います。
仮想マシンができたら、全台で各 NIC(二つ)の MAC アドレスを確認しておきます。後続の手順で追って必要になります。確認には PowerCLI が便利です。
> get-vm ocp-* | get-networkadapter | select parent, networkname, macaddress | where {$_.networkname -eq "vlan11-int-ocp-baremetal"} | sort parent

Parent          NetworkName              MacAddress
------          -----------              ----------
ocp-master0     vlan11-int-ocp-baremetal 00:50:56:86:b1:1a
ocp-master1     vlan11-int-ocp-baremetal 00:50:56:86:ad:2a
ocp-master2     vlan11-int-ocp-baremetal 00:50:56:86:76:93
ocp-provisioner vlan11-int-ocp-baremetal 00:50:56:86:25:d6
ocp-worker0     vlan11-int-ocp-baremetal 00:50:56:86:12:86
ocp-worker1     vlan11-int-ocp-baremetal 00:50:56:86:22:0b

> get-vm ocp-* | get-networkadapter | select parent, networkname, macaddress | where {$_.networkname -eq "vlan10-int-ocp-provision"} | sort parent

Parent          NetworkName              MacAddress
------          -----------              ----------
ocp-master0     vlan10-int-ocp-provision 00:50:56:86:32:ec
ocp-master1     vlan10-int-ocp-provision 00:50:56:86:52:17
ocp-master2     vlan10-int-ocp-provision 00:50:56:86:dc:65
ocp-provisioner vlan10-int-ocp-provision 00:50:56:86:c6:e0
ocp-worker0     vlan10-int-ocp-provision 00:50:56:86:10:5b
ocp-worker1     vlan10-int-ocp-provision 00:50:56:86:d0:a0
ユーティリティ VM の構成
図中のベアメタルネットワーク上にルータや DHCP サーバ、DNS サーバが必要なので、これを用意します。が、物理的なモノは用意できないので、今回は仮想マシン上で構成します。大した機能は動かさないので、スペックは最小限で大丈夫です。
| 役割 | vCPU | メモリ | ディスク | NIC #1 | NIC #2 |
| ユーティリティ | 1 | 2 GB | 16 GB | Home | Baremetal |
OS は最新の RHEL 8.3 を導入しました。最小限の構成でインストールした後、ルータや DHCP サーバ、DNS サーバを作成していきます。
初期設定
IP アドレスとホスト名などを構成します。
localectl set-keymap jp106
hostnamectl set-hostname util.ocp.kuro.lab
nmcli con mod ens192 connection.autoconnect yes ipv4.method manual ipv4.addresses 192.168.0.240/24 ipv4.gateway 192.168.0.1 ipv4.dns 192.168.0.1
nmcli con mod ens224 connection.autoconnect yes ipv4.method manual ipv4.addresses 10.0.0.254/24
reboot
ルータとしての設定
ルータといいつつ単に IP マスカレードを使うようにするだけです。今回は、ベアメタルネットワークとホームネットワークの間で双方向に NAPT させます。firewalld で事前定義されているゾーンのうち、external は masquarade がデフォルトで yes なので、手動での変更は、ゾーンの切り替えと internal の IP マスカレードの有効化だけです。
nmcli con mod ens192 connection.zone external
nmcli con mod ens224 connection.zone internal
firewall-cmd --add-masquerade --zone=internal --permanent
firewall-cmd --reload
DNS サーバの構成
ドキュメントの Network requirements にはあまり情報が書いていませんが、クラスタで利用するノードや仮想 IP アドレス類を外部から名前解決できるようにします。
ここでは、dnsmasq を利用します。基本、/etc/hosts と同じ書式のファイルを読ませるだけですが、それではワイルドカードの名前解決は表現できないので、*.apps 相当のエントリのみ設定ファイルに address 行でベタ書きしています。
dnf install -y dnsmasq
systemctl enable dnsmasq
systemctl start dnsmasq

cat << EOF > /etc/hosts.dnsmasq
10.0.0.10 openshift-master-0
10.0.0.11 openshift-master-1
10.0.0.12 openshift-master-2
10.0.0.20 openshift-worker-0
10.0.0.21 openshift-worker-1
10.0.0.50 api
10.0.0.253 provisioner
EOF

cat << EOF > /etc/dnsmasq.d/dns.dns
domain-needed
bind-dynamic
bogus-priv
domain=ocp.kuro.lab
interface=ens224
no-hosts
addn-hosts=/etc/hosts.dnsmasq
expand-hosts
address=/.apps.ocp.kuro.lab/10.0.0.52
EOF

systemctl restart dnsmasq

firewall-cmd --add-service=dns --zone=internal --permanent
firewall-cmd --reload
DHCP サーバの構成
これもドキュメントの Network requirements にはあまり細かく書いていませんが、静的 DHCP エントリを作成して、DHCP クライアントの MAC アドレスに応じて IP アドレスとホスト名が自動で応答されるようにします。
これにも、dnsmasq を利用します。
cat << EOF > /etc/dnsmasq.d/dhcp.dns
domain-needed
bind-dynamic
bogus-priv
domain=ocp.kuro.lab
dhcp-range=10.0.0.10,10.0.0.49
dhcp-option=3,10.0.0.254
resolv-file=/etc/resolv.conf.upstream
interface=ens224
server=10.0.0.254
dhcp-host=00:50:56:86:25:d6,provisioner.ocp.kuro.lab,10.0.0.253
dhcp-host=00:50:56:86:b1:1a,openshift-master-0.ocp.kuro.lab,10.0.0.10
dhcp-host=00:50:56:86:ad:2a,openshift-master-1.ocp.kuro.lab,10.0.0.11
dhcp-host=00:50:56:86:76:93,openshift-master-2.ocp.kuro.lab,10.0.0.12
dhcp-host=00:50:56:86:12:86,openshift-worker-0.ocp.kuro.lab,10.0.0.20
dhcp-host=00:50:56:86:22:0b,openshift-worker-1.ocp.kuro.lab,10.0.0.21
EOF

cat << EOF > /etc/resolv.conf.upstream
nameserver 192.168.0.1
EOF

systemctl restart dnsmasq

firewall-cmd --add-service=dhcp --zone=internal --permanent
firewall-cmd --reload
記述する MAC アドレスは、各ノードのベアメタルネットワーク側の NIC のものです。
VirtualBMC for vSphere の構成
インストール先のノードは本来は物理サーバで用意しますが、今回は vSphere 環境の仮想マシンで代替します。しかしながら、IPI インストールでは物理サーバの BMC を使う要件があり、単に仮想マシンを立てただけでは不十分です。
そこで、vSphere 環境の仮想マシンに仮想 BMC インタフェイスを提供できる VirtualBMC for vSphere を使って、仮想マシンを IPMI で制御できるようにします。
dnf install -y python38
python3 -m pip install -U pip
python3 -m pip install vbmc4vsphere

vbmcd

vbmc add ocp-master0 --port 6230 --viserver kuro-vcs01.krkb.lab --viserver-username vbmc@vsphere.local --viserver-password ********
vbmc add ocp-master1 --port 6231 --viserver kuro-vcs01.krkb.lab --viserver-username vbmc@vsphere.local --viserver-password ********
vbmc add ocp-master2 --port 6232 --viserver kuro-vcs01.krkb.lab --viserver-username vbmc@vsphere.local --viserver-password ********
vbmc add ocp-worker0 --port 6233 --viserver kuro-vcs01.krkb.lab --viserver-username vbmc@vsphere.local --viserver-password ********
vbmc add ocp-worker1 --port 6234 --viserver kuro-vcs01.krkb.lab --viserver-username vbmc@vsphere.local --viserver-password ********

vbmc start ocp-master0
vbmc start ocp-master1
vbmc start ocp-master2
vbmc start ocp-worker0
vbmc start ocp-worker1

firewall-cmd --add-port=6230-6234/udp --zone=internal --permanent
firewall-cmd --reload
プロビジョニング VM の構成
前の手順で作成したプロビジョニング VM に、RHEL 8.3 を最小限の構成で導入して構成していきます。
OS インストールの手順自体は割愛しますが、前述の DHCP サーバや DNS サーバ、ルータの機能が正しく機能していれば、何もしなくても MAC アドレスを基に静的な IP アドレスとホスト名が正しく取得されるほか、インタネットに名前解決を含めて出られるようになっているはずです。また、ホームネットワーク内の端末で 10.0.0.0/24 宛のルートをユーティリティ VM に向けて構成すれば、そこから直接プロビジョニング VM に SSH できるようになるはずです。
OS のインストールができたら、ここからは愚直にドキュメントに従っていきます。
設定ファイルの作成まで
ところどころ変なところがあるので、注記が必要なところだけピックアップします。
Preparing the provisioner node for OpenShift Container Platform installation
途中、sudo nohup bash -c で nmcli を流し込む手順がありますが、クォートがシングルなので環境変数が展開されずに期待通りに構成されません(#27579)。また、IPv4 の場合は provisioning には IPv4 の IP アドレスを振ります。よって、次のようにします。
[kni@provisioner ~]$ export PUB_CONN=<baremetal_nic_name>
[kni@provisioner ~]$ export PROV_CONN=<prov_nic_name>
[kni@provisioner ~]$ sudo -E nohup bash -c '
    nmcli con down "$PROV_CONN"
    nmcli con down "$PUB_CONN"
    nmcli con delete "$PROV_CONN"
    nmcli con delete "$PUB_CONN"
    # RHEL 8.1 appends the word "System" in front of the connection, delete in case it exists
    nmcli con down "System $PUB_CONN"
    nmcli con delete "System $PUB_CONN"
    nmcli connection add ifname provisioning type bridge con-name provisioning
    nmcli con add type bridge-slave ifname "$PROV_CONN" master provisioning
    nmcli connection add ifname baremetal type bridge con-name baremetal
    nmcli con add type bridge-slave ifname "$PUB_CONN" master baremetal
    pkill dhclient; dhclient baremetal
    nmcli connection modify provisioning ipv4.addresses 172.22.0.1/24 ipv4.method manual
    nmcli con down provisioning
    nmcli con up provisioning
'
Extracting the OpenShift Container Platform installer
curl で oc のバイナリをダウンロードしますが、引数で与えている URL が 404 になって失敗します(#27495)。ファイル名に -$VERSION は不要なので、次のようにします。
[kni@provisioner ~]$ curl -s https://mirror.openshift.com/pub/openshift-v4/clients/ocp/$VERSION/openshift-client-linux.tar.gz | tar zxvf - oc
Creating an RHCOS images cache (optional)
firewall-cmd で 8080/tcp を追加しますが、その後リロードしていないので実際には通信できないままになってしまいます(#27585)。リロードします。
[kni@provisioner ~]$ sudo firewall-cmd --reload
インストーラから Commit ID を取得する手順では、バイナリの位置が違っているので失敗します(#27583)。カレントディレクトリのバイナリを使ってもよいですが、どちらかというとバイナリの /usr/local/bin へのコピーが抜けている感触なので、そのようにします。
[kni@provisioner ~]$ sudo cp ./openshift-baremetal-install /usr/local/bin
[kni@provisioner ~]$ export COMMIT_ID=$(/usr/local/bin/openshift-baremetal-install version | grep '^built from commit' | awk '{print $4}')
curl でイメージをダウンロードする手順では、-o でディレクトリ名を与えているので失敗します(#27584)。-o にファイル名を加えて回避します。
[kni@provisioner ~]$ curl -L ${RHCOS_PATH}${RHCOS_QEMU_URI} -o /home/kni/rhcos_image_cache/${RHCOS_QEMU_URI}
[kni@provisioner ~]$ curl -L ${RHCOS_PATH}${RHCOS_OPENSTACK_URI} -o /home/kni/rhcos_image_cache/${RHCOS_OPENSTACK_URI}
設定ファイルの作成
いちばん大事なファイルです。サンプルを参考に install-config.yaml を作成します。
apiVersion: v1
baseDomain: kuro.lab
metadata:
  name: ocp
networking:
  machineCIDR: 10.0.0.0/24
  networkType: OVNKubernetes
compute:
- name: worker
  replicas: 2
controlPlane:
  name: master
  replicas: 3
  platform:
    baremetal: {}
platform:
  baremetal:
    apiVIP: 10.0.0.50
    ingressVIP: 10.0.0.52
    provisioningBridge: provisioning
    provisioningNetworkInterface: ens192
    provisioningNetworkCIDR: 172.22.0.0/24
    hosts:
      - name: openshift-master-0
        role: master
        bmc:
          address: ipmi://10.0.0.254:6230
          username: admin
          password: password
        bootMACAddress: 00:50:56:86:32:ec
      - name: openshift-master-1
        role: master
        bmc:
          address: ipmi://10.0.0.254:6231
          username: admin
          password: password
        bootMACAddress: 00:50:56:86:52:17
      - name: openshift-master-2
        role: master
        bmc:
          address: ipmi://10.0.0.254:6232
          username: admin
          password: password
        bootMACAddress: 00:50:56:86:dc:65
      - name: openshift-worker-0
        role: worker
        bmc:
          address: ipmi://10.0.0.254:6233
          username: admin
          password: password
        bootMACAddress: 00:50:56:86:10:5b
      - name: openshift-worker-1
        role: worker
        bmc:
          address: ipmi://10.0.0.254:6234
          username: admin
          password: password
        bootMACAddress: 00:50:56:86:d0:a0
    bootstrapOSImage: http://provisioner.ocp.kuro.lab:8080/rhcos-46.82.202010011740-0-qemu.x86_64.qcow2.gz?sha256=cbaf2e5548af2d1d1153d9a1beca118042e770725166de427792c33a875137cc
    clusterOSImage: http://provisioner.ocp.kuro.lab:8080/rhcos-46.82.202010011740-0-openstack.x86_64.qcow2.gz?sha256=9d88edcacbdf31db9cb9418ee3721c74a3f5bbfc4904db9e383e674a86335bd1
pullSecret: '{"auths":{...}}'
sshKey: 'ssh-rsa ... kni@provisioner'
ポイントは以下です。
platform.baremetal.provisioningNetworkInterface- ドキュメントに記載はありませんが、無いと次のメッセージで怒られました
FATAL failed to fetch Cluster: failed to fetch dependency of "Cluster": failed to generate asset "Platform Provisioning Check": platform.baremetal.provisioningNetworkInterface: Invalid value: "": no provisioning network interface is configured, please set this value to be the interface on the provisioning network on your cluster's baremetal hosts
platform.baremetal.hosts[*].bmc- 物理サーバのごとの BMC の IP アドレスと認証情報です
- 今回の例では、行き先は VirtualBMC です。ノードごとに対応する IP アドレスとポート番号と認証情報を入れています
platform.baremetal.hosts[*].bootMACAddress- ノードごとのプロビジョニングネットワーク側の NIC の MAC アドレスです
- ノードが PXE ブートする際、ブートストラップ VM 内で動作する DHCP サーバが対象のノードを判断するときに使われます
platform.baremetal.bootstrapOSImage、platform.baremetal.clusterOSImage- 今回はオプショナルの手順を実行して、 RHCOS のイメージキャッシュをプロビジョニング VM 上に取得し、HTTP で公開しています。インストーラの中でそのキャッシュを利用するため、URL を指定しています
- URL にはファイル名とハッシュ値を含める必要がありますが、必要な情報は前段の手順で環境変数に保存済みで、それぞれ次のコマンドで得られます
echo ${RHCOS_QEMU_URI}?sha256=${RHCOS_QEMU_SHA_UNCOMPRESSED}echo ${RHCOS_OPENSTACK_URI}?sha256=${RHCOS_OPENSTACK_SHA_COMPRESSED}
pullSecret- 前段の手順で作成した
pull-secret.txtの中身をそのまま記入します
- 前段の手順で作成した
sshKey- 前段の手順で作成した
/home/kni/.ssh/id_rsa.pubの中身をそのまま記入します。
- 前段の手順で作成した
ファイルができたら、インストール用のマニフェストを作成します。
mkdir ~/clusterconfigs
cp install-config.yaml ~/clusterconfigs
./openshift-baremetal-install --dir ~/clusterconfigs create manifests
インストール
ここまでできたら、インストーラを走らせて待つだけです。
実行
./openshift-baremetal-install --dir ~/clusterconfigs --log-level debug create cluster
進捗は画面にも出ますが、ログファイルとしても出力されます。
tail -f ~/clusterconfigs/.openshift_install.log
観察
何も起きなければ放置するだけですが、興味があれば、構成の途中では、プロビジョニング VM 上で動作するブートストラップ VM の様子をみたり、
$ sudo virsh list
 Id   Name                  State
-------------------------------------
 1    ocp-6vw5v-bootstrap   running
ブートストラップ VM のコンソール出力を確認したり、
$ sudo virsh console ocp-6vw5v-bootstrap
Connected to domain ocp-6vw5v-bootstrap
Escape character is ^]
[***   ] A start job is running for Ignition (fetch-offline) (47s / no limit)
...
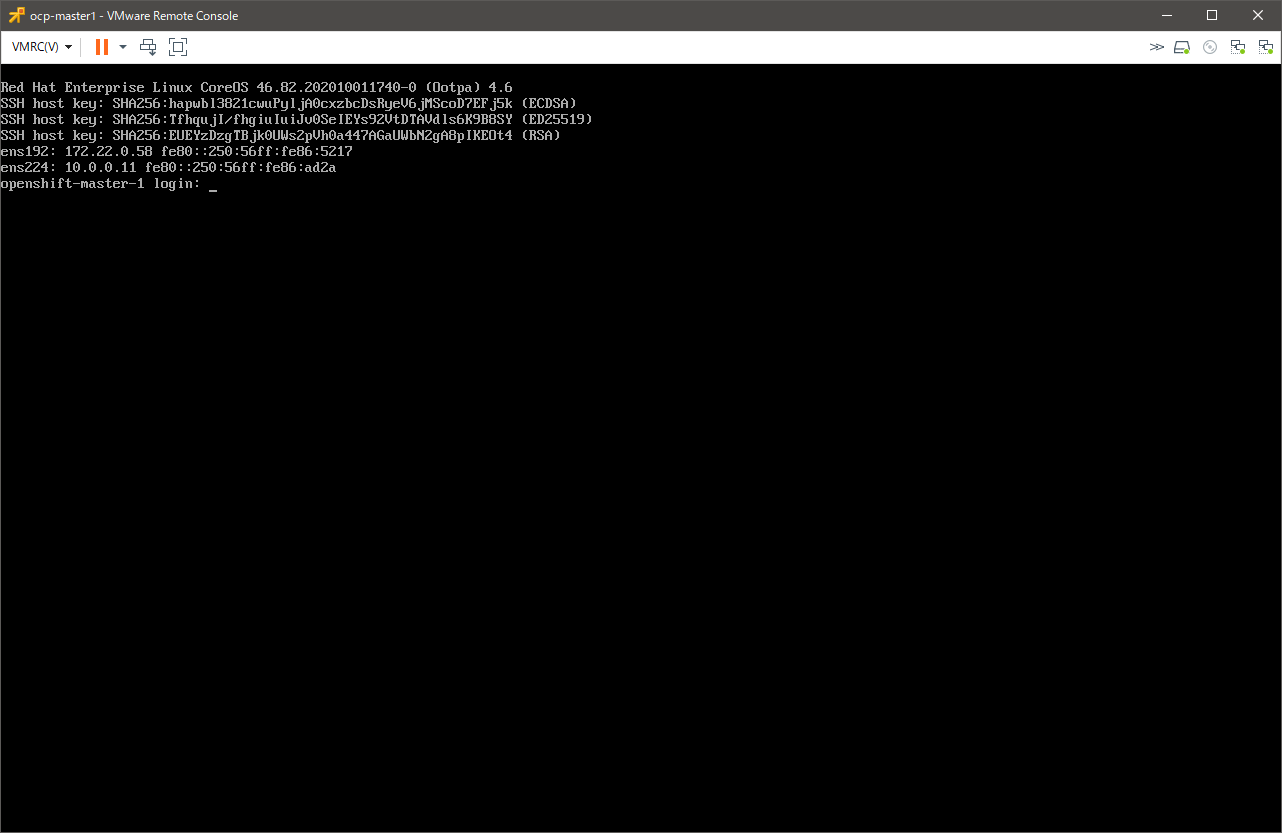
その IP アドレスを確認して SSH したり、
$ sudo virsh console ocp-6vw5v-bootstrap
Connected to domain ocp-6vw5v-bootstrap
Escape character is ^]
Red Hat Enterprise Linux CoreOS 46.82.202010011740-0 (Ootpa) 4.6
...
ens3: 10.0.0.30 fe80::5054:ff:fe42:654d
ens4: 172.22.0.2 fe80::5607:c92e:39f2:add1
localhost login:

$ ssh core@172.22.0.2
...
[core@localhost ~]$
さらにその中で Podman の様子を見たり、
[core@localhost ~]$ sudo podman ps -a
CONTAINER ID  IMAGE                                                                                                                   COMMAND               CREATED         STATUS                     PORTS  NAMES
...
7d77a65def19  quay.io/openshift-release-dev/ocp-v4.0-art-dev@sha256:796617722a915d79b478c9623b1d152a397478a7f6ba7ec71d39b9df2668cc80                        35 seconds ago  Up 32 seconds ago                 httpd
051f0c4e27d2  quay.io/openshift-release-dev/ocp-v4.0-art-dev@sha256:796617722a915d79b478c9623b1d152a397478a7f6ba7ec71d39b9df2668cc80                        35 seconds ago  Up 35 seconds ago                 mariadb
ebed2f88723f  quay.io/openshift-release-dev/ocp-v4.0-art-dev@sha256:796617722a915d79b478c9623b1d152a397478a7f6ba7ec71d39b9df2668cc80                        35 seconds ago  Up 35 seconds ago                 dnsmasq

[core@localhost ~]$ sudo podman logs -f ironic-conductor
...
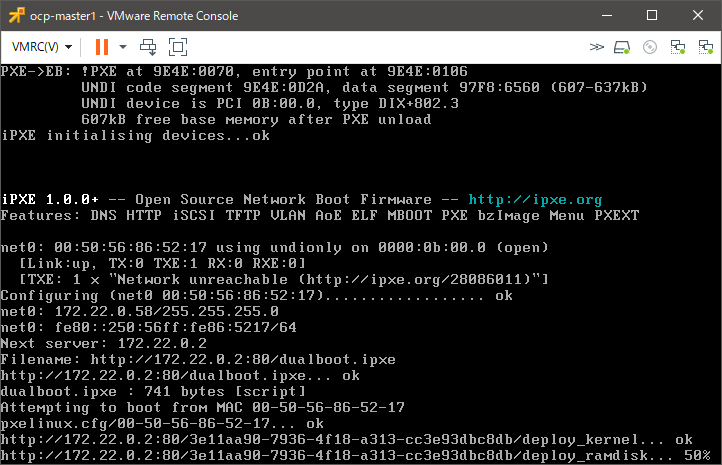
他にも、仮想マシンが PXE ブートしたり、勝手にブートデバイスが切り替わりながら再起動していく様子を眺めたりするとおもしろいですね。手を一切触れずにごりごりインストールが進むのは気持ちがよいものです。
ログ抜粋
最終的には、ログはこんな感じになります。抜粋です。
[kni@provisioner ~]$ ./openshift-baremetal-install --dir ~/clusterconfigs --log-level debug create cluster
DEBUG OpenShift Installer 4.6.4
DEBUG Built from commit 6e02d049701437fa81521fe981405745a62c86c5
DEBUG Fetching Metadata...
DEBUG Loading Metadata...
...
DEBUG Generating Metadata...
DEBUG Fetching Terraform Variables...
DEBUG Loading Terraform Variables...
...
DEBUG Generating Terraform Variables...
INFO Obtaining RHCOS image file from 'http://provisioner.ocp.kuro.lab:8080/rhcos-46.82.202010011740-0-qemu.x86_64.qcow2.gz?sha256=cbaf2e5548af2d1d1153d9a1beca118042e770725166de427792c33a875137cc'
DEBUG Unpacking file into "/home/kni/.cache/openshift-installer/image_cache/da2e0c98a60ddd80b338f1c07e95470c"...
DEBUG decompressing the image archive as gz
DEBUG Checksum validation is complete...
...
DEBUG Generating Cluster...
INFO Creating infrastructure resources...
...
DEBUG Initializing modules...
DEBUG - bootstrap in ../../tmp/openshift-install-671464379/bootstrap
DEBUG - masters in ../../tmp/openshift-install-671464379/masters
DEBUG
DEBUG Initializing the backend...
DEBUG
DEBUG Initializing provider plugins...
DEBUG
DEBUG Terraform has been successfully initialized!
DEBUG
DEBUG You may now begin working with Terraform. Try running "terraform plan" to see
DEBUG any changes that are required for your infrastructure. All Terraform commands
DEBUG should now work.
DEBUG
DEBUG If you ever set or change modules or backend configuration for Terraform,
DEBUG rerun this command to reinitialize your working directory. If you forget, other
DEBUG commands will detect it and remind you to do so if necessary.
DEBUG module.masters.ironic_node_v1.openshift-master-host[1]: Creating...
DEBUG module.masters.ironic_node_v1.openshift-master-host[0]: Creating...
DEBUG module.masters.ironic_node_v1.openshift-master-host[2]: Creating...
DEBUG module.bootstrap.libvirt_pool.bootstrap: Creating...
DEBUG module.bootstrap.libvirt_ignition.bootstrap: Creating...
...
DEBUG module.bootstrap.libvirt_pool.bootstrap: Creation complete after 2m0s [id=4c9066e8-7240-4618-ac54-d7fc408b3577]
DEBUG module.bootstrap.libvirt_volume.bootstrap: Creating...
DEBUG module.bootstrap.libvirt_ignition.bootstrap: Still creating... [2m0s elapsed]
DEBUG module.bootstrap.libvirt_ignition.bootstrap: Creation complete after 2m0s [id=/var/lib/libvirt/images/ocp-696dd-bootstrap.ign;5fbbb954-a9a5-e294-8706-526fed148028]
DEBUG module.bootstrap.libvirt_volume.bootstrap: Creation complete after 3s [id=/var/lib/libvirt/openshift-images/ocp-696dd-bootstrap/ocp-696dd-bootstrap]
DEBUG module.bootstrap.libvirt_domain.bootstrap: Creating...
DEBUG module.bootstrap.libvirt_domain.bootstrap: Creation complete after 1s [id=974fd0fc-f96a-4a32-bf2a-15b19f6b1903]
...
DEBUG module.masters.ironic_node_v1.openshift-master-host[2]: Still creating... [16m0s elapsed]
DEBUG module.masters.ironic_node_v1.openshift-master-host[0]: Still creating... [16m0s elapsed]
DEBUG module.masters.ironic_node_v1.openshift-master-host[1]: Still creating... [16m0s elapsed]
DEBUG module.masters.ironic_node_v1.openshift-master-host[0]: Creation complete after 16m8s [id=e3fc6aa6-08c2-452e-bd70-de55a7655d2a]
DEBUG module.masters.ironic_node_v1.openshift-master-host[1]: Creation complete after 16m8s [id=1e8c4e48-f0de-4910-a9da-3482590f38bf]
DEBUG module.masters.ironic_node_v1.openshift-master-host[2]: Creation complete after 16m8s [id=21687363-7580-4473-abb2-16cb5022d672]
DEBUG module.masters.data.ironic_introspection.openshift-master-introspection[2]: Refreshing state...
DEBUG module.masters.data.ironic_introspection.openshift-master-introspection[1]: Refreshing state...
DEBUG module.masters.data.ironic_introspection.openshift-master-introspection[0]: Refreshing state...
DEBUG module.masters.ironic_allocation_v1.openshift-master-allocation[2]: Creating...
DEBUG module.masters.ironic_allocation_v1.openshift-master-allocation[0]: Creating...
DEBUG module.masters.ironic_allocation_v1.openshift-master-allocation[1]: Creating...
DEBUG module.masters.ironic_allocation_v1.openshift-master-allocation[1]: Creation complete after 2s [id=856f28b9-ae7f-4584-a34b-2be2050f5ebd]
DEBUG module.masters.ironic_allocation_v1.openshift-master-allocation[2]: Creation complete after 2s [id=f4a48b25-7046-4588-8c97-9838be83d66c]
DEBUG module.masters.ironic_allocation_v1.openshift-master-allocation[0]: Creation complete after 2s [id=c4bc140a-6bbe-47c1-afcb-88c08b6d688f]
DEBUG module.masters.ironic_deployment.openshift-master-deployment[2]: Creating...
DEBUG module.masters.ironic_deployment.openshift-master-deployment[1]: Creating...
DEBUG module.masters.ironic_deployment.openshift-master-deployment[0]: Creating...
...
DEBUG module.masters.ironic_deployment.openshift-master-deployment[0]: Still creating... [7m0s elapsed]
DEBUG module.masters.ironic_deployment.openshift-master-deployment[1]: Still creating... [7m0s elapsed]
DEBUG module.masters.ironic_deployment.openshift-master-deployment[2]: Still creating... [7m0s elapsed]
DEBUG module.masters.ironic_deployment.openshift-master-deployment[1]: Creation complete after 7m1s [id=1e8c4e48-f0de-4910-a9da-3482590f38bf]
DEBUG module.masters.ironic_deployment.openshift-master-deployment[0]: Creation complete after 7m1s [id=21687363-7580-4473-abb2-16cb5022d672]
DEBUG module.masters.ironic_deployment.openshift-master-deployment[2]: Creation complete after 7m1s [id=e3fc6aa6-08c2-452e-bd70-de55a7655d2a]
DEBUG
DEBUG Apply complete! Resources: 13 added, 0 changed, 0 destroyed.
DEBUG OpenShift Installer 4.6.4
DEBUG Built from commit 6e02d049701437fa81521fe981405745a62c86c5
INFO Waiting up to 20m0s for the Kubernetes API at https://api.ocp.kuro.lab:6443...
INFO API v1.19.0+9f84db3 up
INFO Waiting up to 30m0s for bootstrapping to complete...
DEBUG Bootstrap status: complete
INFO Destroying the bootstrap resources...
...
DEBUG Initializing modules...
DEBUG - bootstrap in ../../tmp/openshift-install-804823006/bootstrap
DEBUG - masters in ../../tmp/openshift-install-804823006/masters
DEBUG
DEBUG Initializing the backend...
DEBUG
DEBUG Initializing provider plugins...
DEBUG
DEBUG Terraform has been successfully initialized!
DEBUG
DEBUG You may now begin working with Terraform. Try running "terraform plan" to see
DEBUG any changes that are required for your infrastructure. All Terraform commands
DEBUG should now work.
DEBUG
DEBUG If you ever set or change modules or backend configuration for Terraform,
DEBUG rerun this command to reinitialize your working directory. If you forget, other
DEBUG commands will detect it and remind you to do so if necessary.
DEBUG module.bootstrap.libvirt_pool.bootstrap: Refreshing state... [id=4c9066e8-7240-4618-ac54-d7fc408b3577]
DEBUG module.bootstrap.libvirt_volume.bootstrap: Refreshing state... [id=/var/lib/libvirt/openshift-images/ocp-696dd-bootstrap/ocp-696dd-bootstrap]
DEBUG module.bootstrap.libvirt_ignition.bootstrap: Refreshing state... [id=/var/lib/libvirt/images/ocp-696dd-bootstrap.ign;5fbbb954-a9a5-e294-8706-526fed148028]
DEBUG module.bootstrap.libvirt_domain.bootstrap: Refreshing state... [id=974fd0fc-f96a-4a32-bf2a-15b19f6b1903]
DEBUG module.bootstrap.libvirt_domain.bootstrap: Destroying... [id=974fd0fc-f96a-4a32-bf2a-15b19f6b1903]
DEBUG module.bootstrap.libvirt_domain.bootstrap: Destruction complete after 1s
DEBUG module.bootstrap.libvirt_volume.bootstrap: Destroying... [id=/var/lib/libvirt/openshift-images/ocp-696dd-bootstrap/ocp-696dd-bootstrap]
DEBUG module.bootstrap.libvirt_ignition.bootstrap: Destroying... [id=/var/lib/libvirt/images/ocp-696dd-bootstrap.ign;5fbbb954-a9a5-e294-8706-526fed148028]
DEBUG module.bootstrap.libvirt_volume.bootstrap: Destruction complete after 0s
DEBUG module.bootstrap.libvirt_ignition.bootstrap: Destruction complete after 0s
DEBUG module.bootstrap.libvirt_pool.bootstrap: Destroying... [id=4c9066e8-7240-4618-ac54-d7fc408b3577]
DEBUG module.bootstrap.libvirt_pool.bootstrap: Destruction complete after 5s
...
DEBUG Destroy complete! Resources: 4 destroyed.
DEBUG Loading Install Config...
DEBUG   Loading SSH Key...
DEBUG   Loading Base Domain...
DEBUG     Loading Platform...
DEBUG   Loading Cluster Name...
DEBUG     Loading Base Domain...
DEBUG     Loading Platform...
DEBUG   Loading Pull Secret...
DEBUG   Loading Platform...
DEBUG Using Install Config loaded from state file
INFO Waiting up to 1h0m0s for the cluster at https://api.ocp.kuro.lab:6443 to initialize...
DEBUG Still waiting for the cluster to initialize: Working towards 4.6.4: 98% complete, waiting on authentication, cluster-autoscaler, console, ingress, kube-storage-version-migrator, machine-api, monitoring
DEBUG Still waiting for the cluster to initialize: Working towards 4.6.4: 99% complete
DEBUG Still waiting for the cluster to initialize: Working towards 4.6.4: 99% complete
DEBUG Still waiting for the cluster to initialize: Working towards 4.6.4: 99% complete, waiting on authentication, console, ingress, kube-storage-version-migrator, monitoring
DEBUG Still waiting for the cluster to initialize: Some cluster operators are still updating: authentication, console, ingress, kube-storage-version-migrator, monitoring
DEBUG Still waiting for the cluster to initialize: Some cluster operators are still updating: authentication, console, monitoring
DEBUG Still waiting for the cluster to initialize: Working towards 4.6.4: 99% complete
DEBUG Cluster is initialized
INFO Waiting up to 10m0s for the openshift-console route to be created...
DEBUG Route found in openshift-console namespace: console
DEBUG Route found in openshift-console namespace: downloads
DEBUG OpenShift console route is created
INFO Install complete!
INFO To access the cluster as the system:admin user when using 'oc', run 'export KUBECONFIG=/home/kni/clusterconfigs/auth/kubeconfig'
INFO Access the OpenShift web-console here: https://console-openshift-console.apps.ocp.kuro.lab
INFO Login to the console with user: "kubeadmin", and password: "*****-*****-*****-*****"
DEBUG Time elapsed per stage:
DEBUG     Infrastructure: 23m17s
DEBUG Bootstrap Complete: 26m22s
DEBUG  Bootstrap Destroy: 11s
DEBUG  Cluster Operators: 32m45s
INFO Time elapsed: 1h22m58s
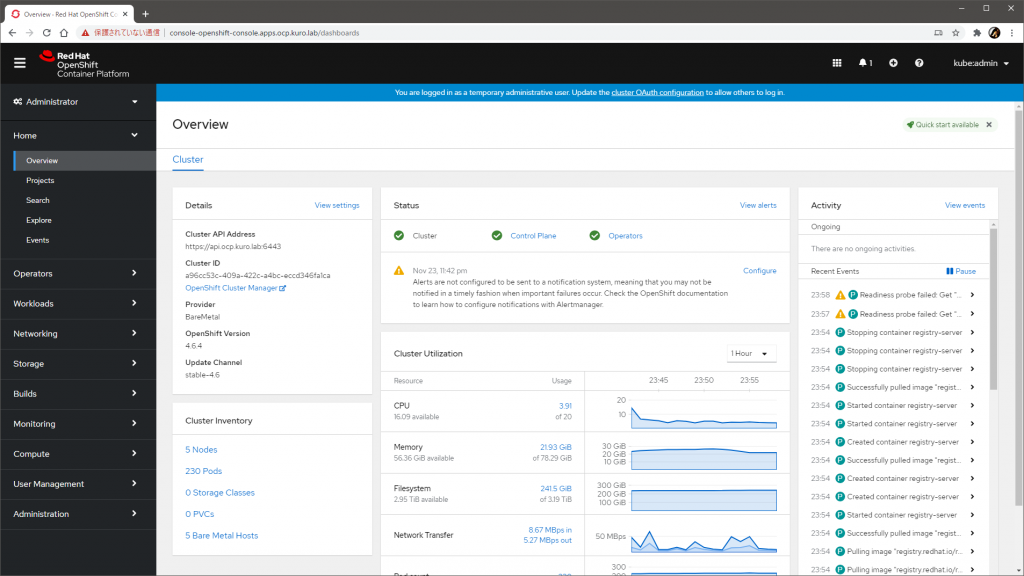
完成
手元の環境では、だいたい一時間半弱くらいで完成しました。CPU がサチっていたので、つよい環境ならもっと早いでしょう。
完成した OpenShift 環境には、インストーラの画面かログの末尾に出力されている URL と認証情報(kubeadmin とそのパスワード)を使ってログインできます。パスワードは ~/clusterconfigs/auth/kubeadmin-password にも平文で保存されています。
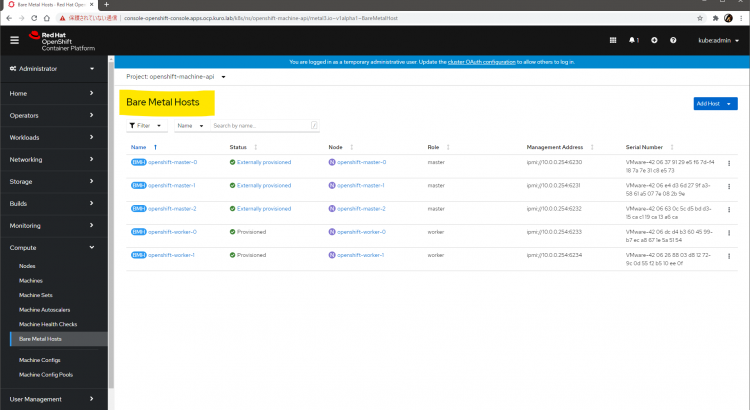
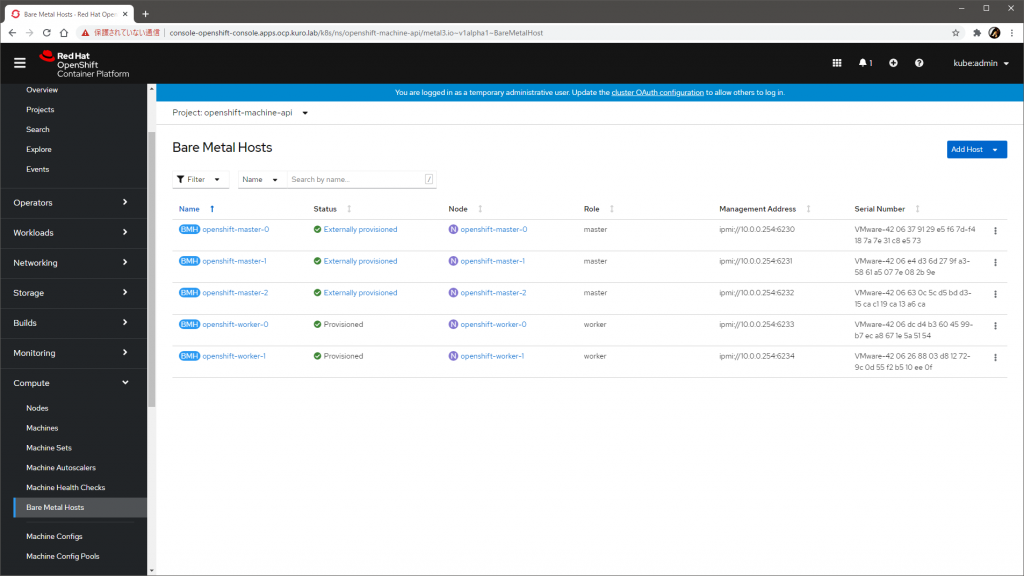
管理画面でも、Bare Metal Hosts として登録されている様子が確認できます。
トラブルシュート
なにかが起きて失敗したとき、失敗の原因は本当にさまざまですが、ドキュメントのトラブルシュートのページには良い情報がたくさん載っているので、困ったときには参考にできます。
インストールを再実行したいときは、次のように掃除して clusterconfigs ディレクトリの作成からやりなおすと確実です。トラブルシュートのページに記載のものだと libvirt の掃除は不完全(#27618)です。
for i in $(sudo virsh list | tail -n +3 | grep bootstrap | awk {'print $2'});
do
  sudo virsh destroy $i;
  sudo virsh undefine $i;
  sudo virsh vol-delete $i --pool $i;
  sudo virsh vol-delete $i.ign --pool default;
  sudo virsh pool-destroy $i;
  sudo virsh pool-undefine $i;
done

rm -rf ~/clusterconfigs
rm -rf ~/.cache
再実行前には、インストール先のノードはすべて停止させます。
なお、プロビジョニング VM や各ノードの負荷が高いと、ところどころインストーラの出力に Failed や failure などネガティブな表現が混ざることがあるようですが、基本的には ERROR でインストーラ自体が止まらない限りは自動でリトライされて進むはずなので、まずは待つのがよさそうです。
簡易初期設定と動作確認
クラスタができても使えなかったら意味がないので、イメージレジストリを構成して、ユーザを追加し、サンプルアプリケーションのビルドと実行ができることくらいは確認しておきます。
イメージレジストリの追加
ベアメタルで構成した場合、組み込みのイメージレジストリはインストール直後は無効化されているので、まずはこれを有効化します。有効化しないと新規イメージのビルドができません。
本来は PV をきちんとつくって永続化すべきですが、いったん emptyDir で逃げます。oc で操作しますが、認証情報はクラスタ作成後に /home/kni/clusterconfigs/auth/kubeconfig に保存されるのでそれを利用します(system:admin になれます)。
[kni@provisioner ~]$ export KUBECONFIG=/home/kni/clusterconfigs/auth/kubeconfig

[kni@provisioner ~]$ oc patch configs.imageregistry.operator.openshift.io cluster --type merge --patch '{"spec":{"managementState":"Managed"}}'

[kni@provisioner ~]$ oc patch configs.imageregistry.operator.openshift.io cluster --type merge --patch '{"spec":{"storage":{"emptyDir":{}}}}'
この操作で、spec.managementState が Managed になって、spec.storage が emptyDir で構成されます。
[kni@provisioner ~]$ oc get configs.imageregistry.operator.openshift.io cluster -o jsonpath={.spec} | jq
{
  ...
  "managementState": "Managed",
  ...
  "storage": {
    "emptyDir": {},
    "managementState": "Managed"
  },
  ...
}
ユーザの追加
インストーラによって作成されたユーザ kubeadmin は、スーパユーザすぎて常用すべきではないので、別のユーザを作ります。
ユーザを追加するにはまずは IDP を登録しなければならないので、ここではいちばん手軽な HTPasswd を構成します。
まずは HTPasswd ファイルを作成します。
[kni@provisioner ~]$ sudo dnf install -y httpd-tools
[kni@provisioner ~]$ htpasswd -c -B -b ~/clusterconfigs/auth/htpasswd lab-admin VMware123!
続いて、作成した HTPasswd ファイルを中身にしたシークレットを作成します。GUI からも操作できますが、せっかくなので oc します。
[kni@provisioner ~]$ oc create secret generic htpasswd-secret --from-file=htpasswd=$(pwd)/clusterconfigs/auth/htpasswd -n openshift-config
IDP を定義するカスタムリソースのマニフェストを作って流し込みます。これも同等のことが GUI でも可能です。
[kni@provisioner ~]$ cat << EOF > ~/clusterconfigs/auth/idp.yaml
apiVersion: config.openshift.io/v1
kind: OAuth
metadata:
  name: cluster
spec:
  identityProviders:
  - name: htpasswd-provider
    mappingMethod: claim
    type: HTPasswd
    htpasswd:
      fileData:
        name: htpasswd-secret
EOF

[kni@provisioner ~]$ oc apply -f ~/clusterconfigs/auth/idp.yaml
これで認証できるようになったので、テスト用に新しいプロジェクトを作って admin ロールを割り当てます。この段階では lab-admin ユーザは一度もログインしていないため内部的に存在しないので警告が出ますが、問題ありません。
[kni@provisioner ~]$ oc new-project lab-sample
[kni@provisioner ~]$ oc adm policy add-role-to-user admin lab-admin -n lab-sample
この後、lab-admin ユーザとして oc でログインすると、認証が通り、lab-sample プロジェクトを触れる状態になります。ロールの割り当てをせずにログインして new-project しても同じ状態になるはずです。
$ oc login -u lab-admin
Authentication required for https://api.ocp.kuro.lab:6443 (openshift)
Username: lab-admin
Password:
Login successful.

You have one project on this server: "lab-sample"

Using project "lab-sample".
サンプルアプリケーションのデプロイ
ここまできたらそこそこ使える状態です。
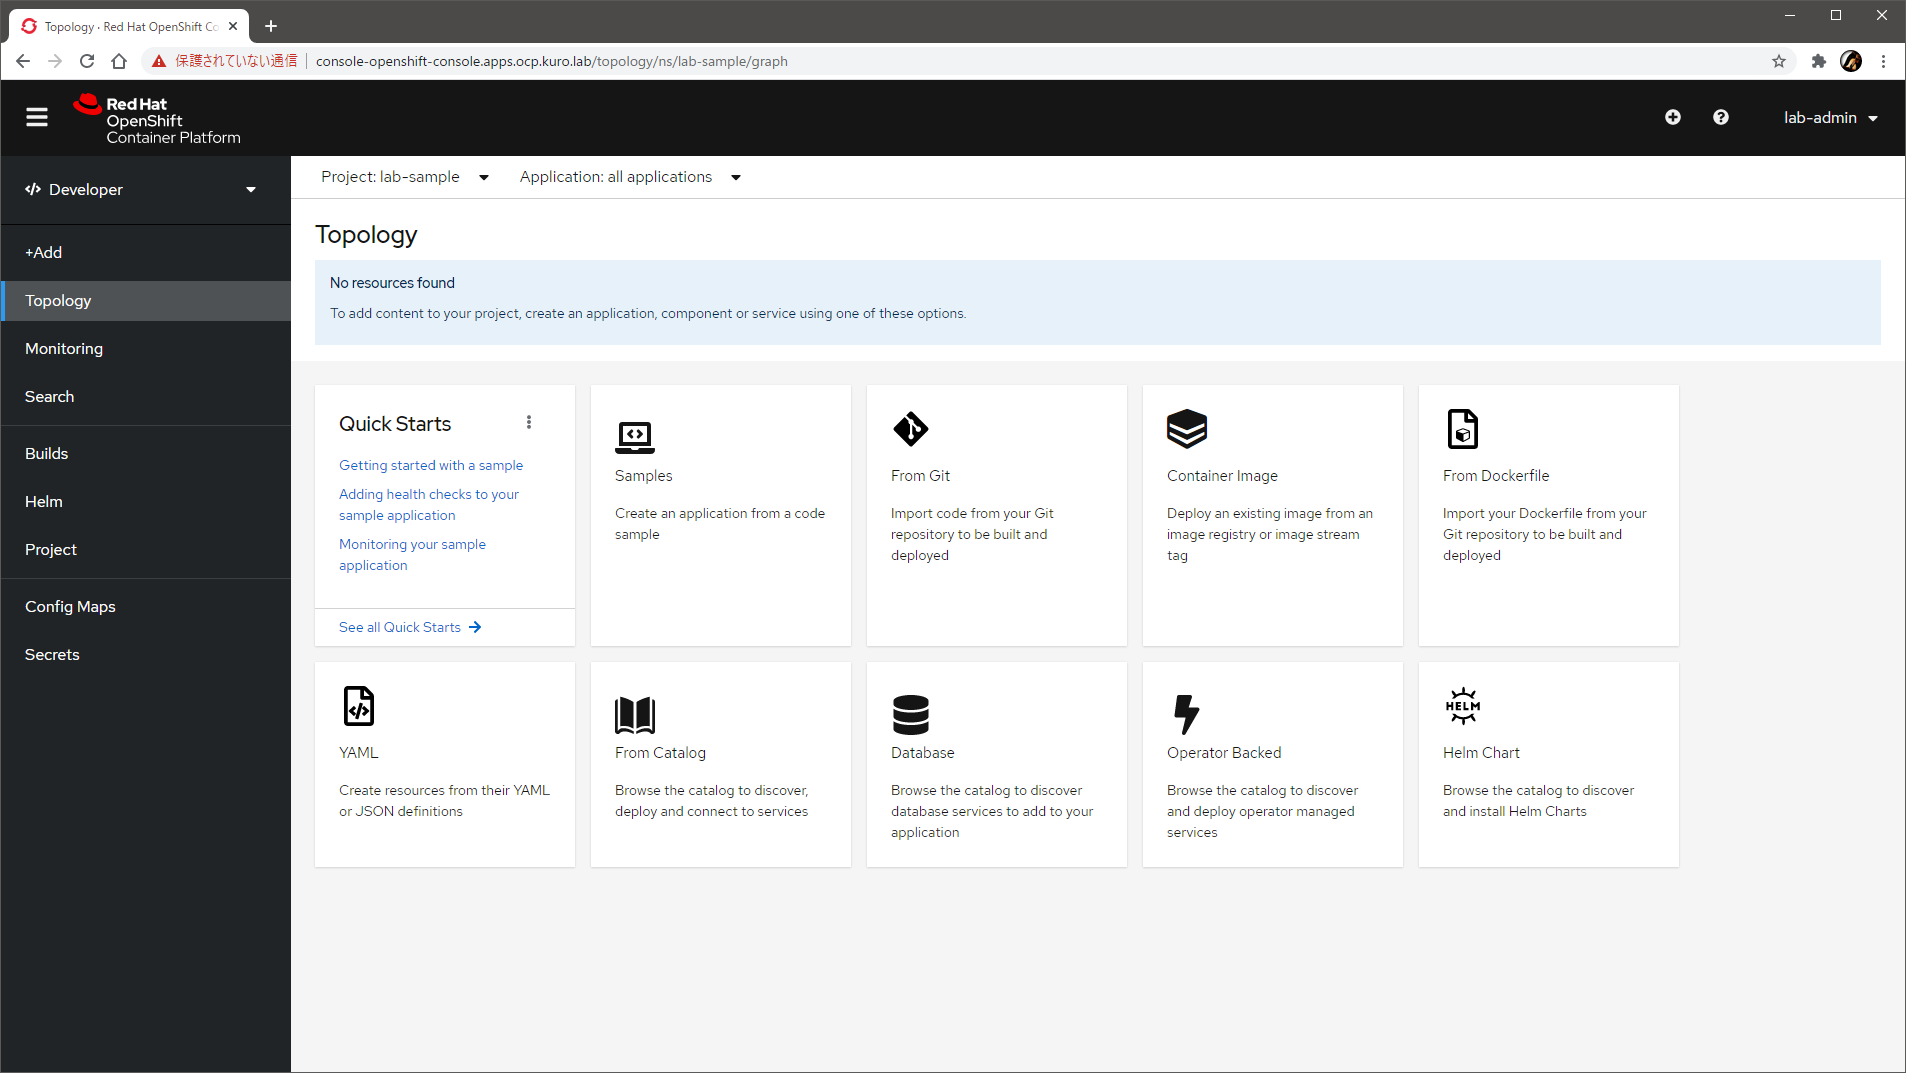
GUI に lab-admin でログインして、デベロッパコンソールのカタログからサンプルアプリケーションをデプロイします。今回は適当に Django のヤツを選びました。
ベースイメージと GitHub のサンプルコードを使ってビルドが走り、イメージがレジストリにプッシュされ、そのイメージを使ってポッドが作成されます。

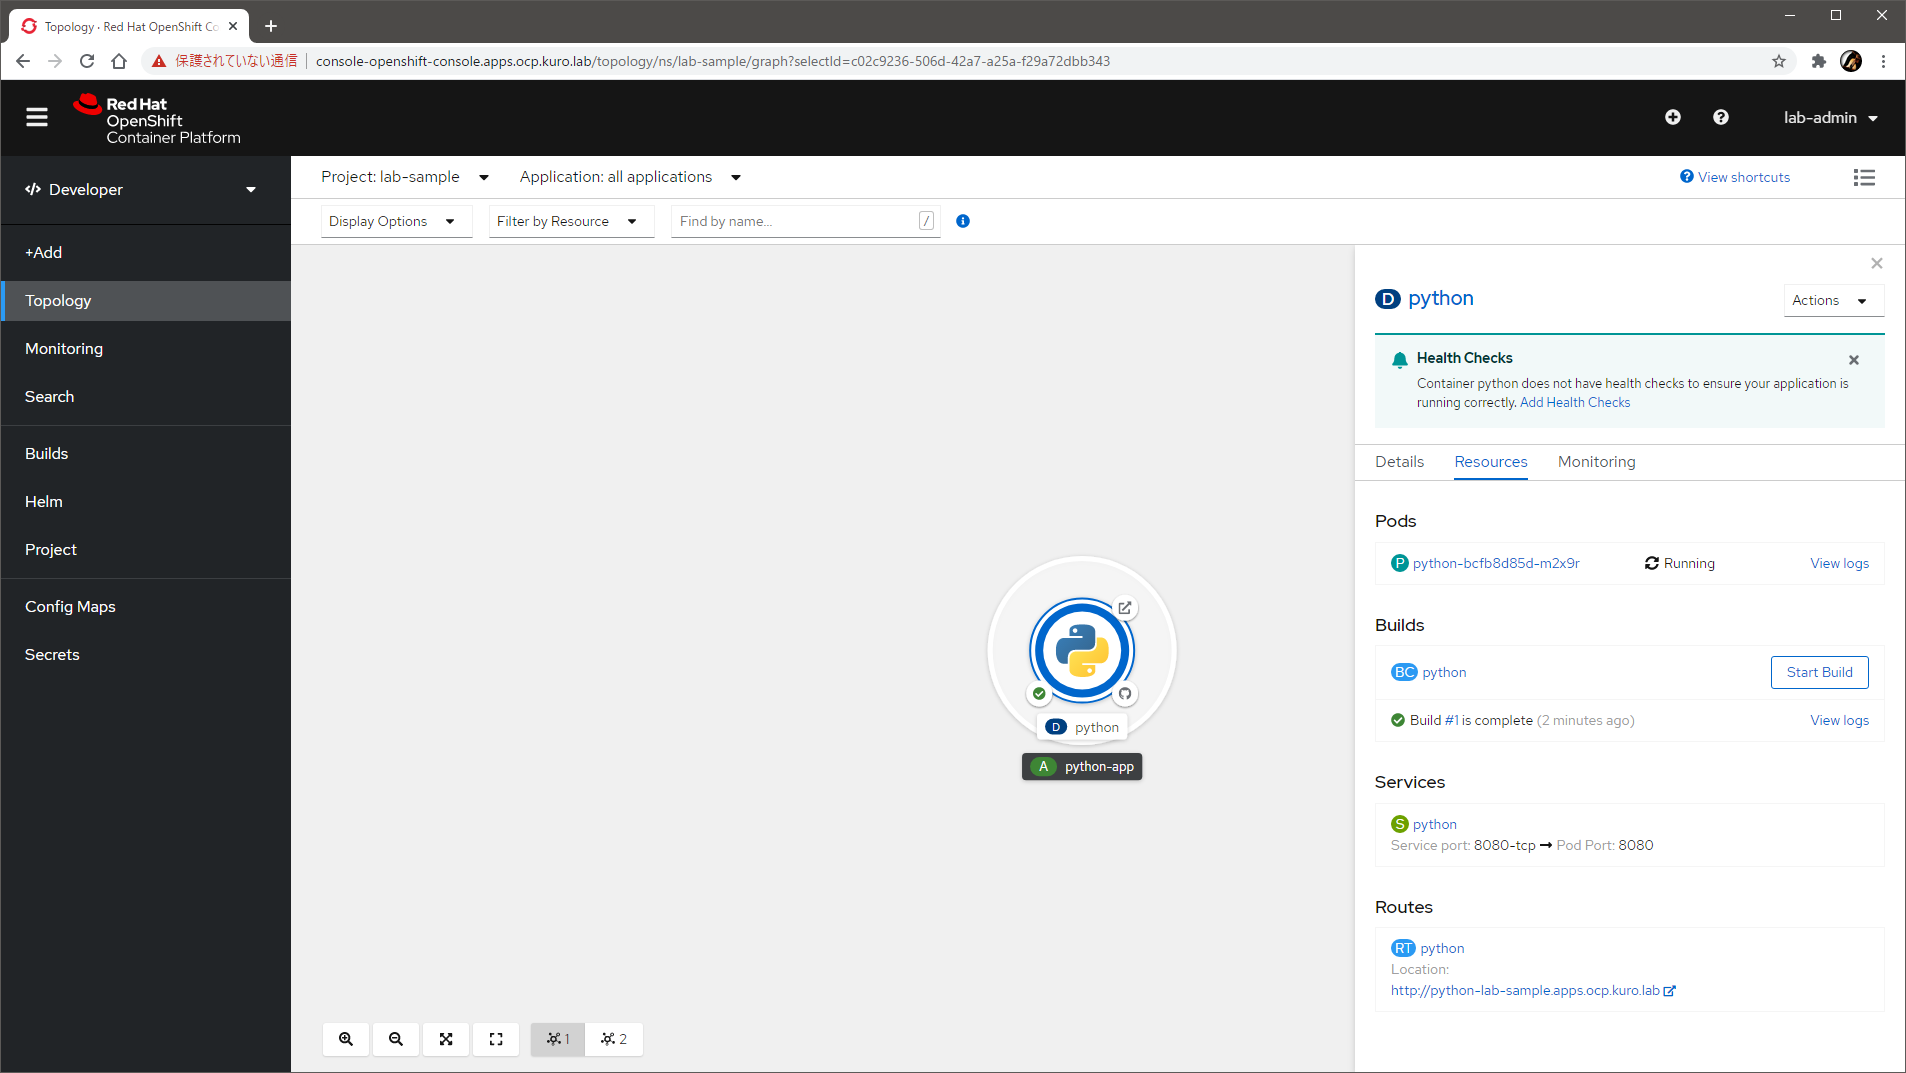
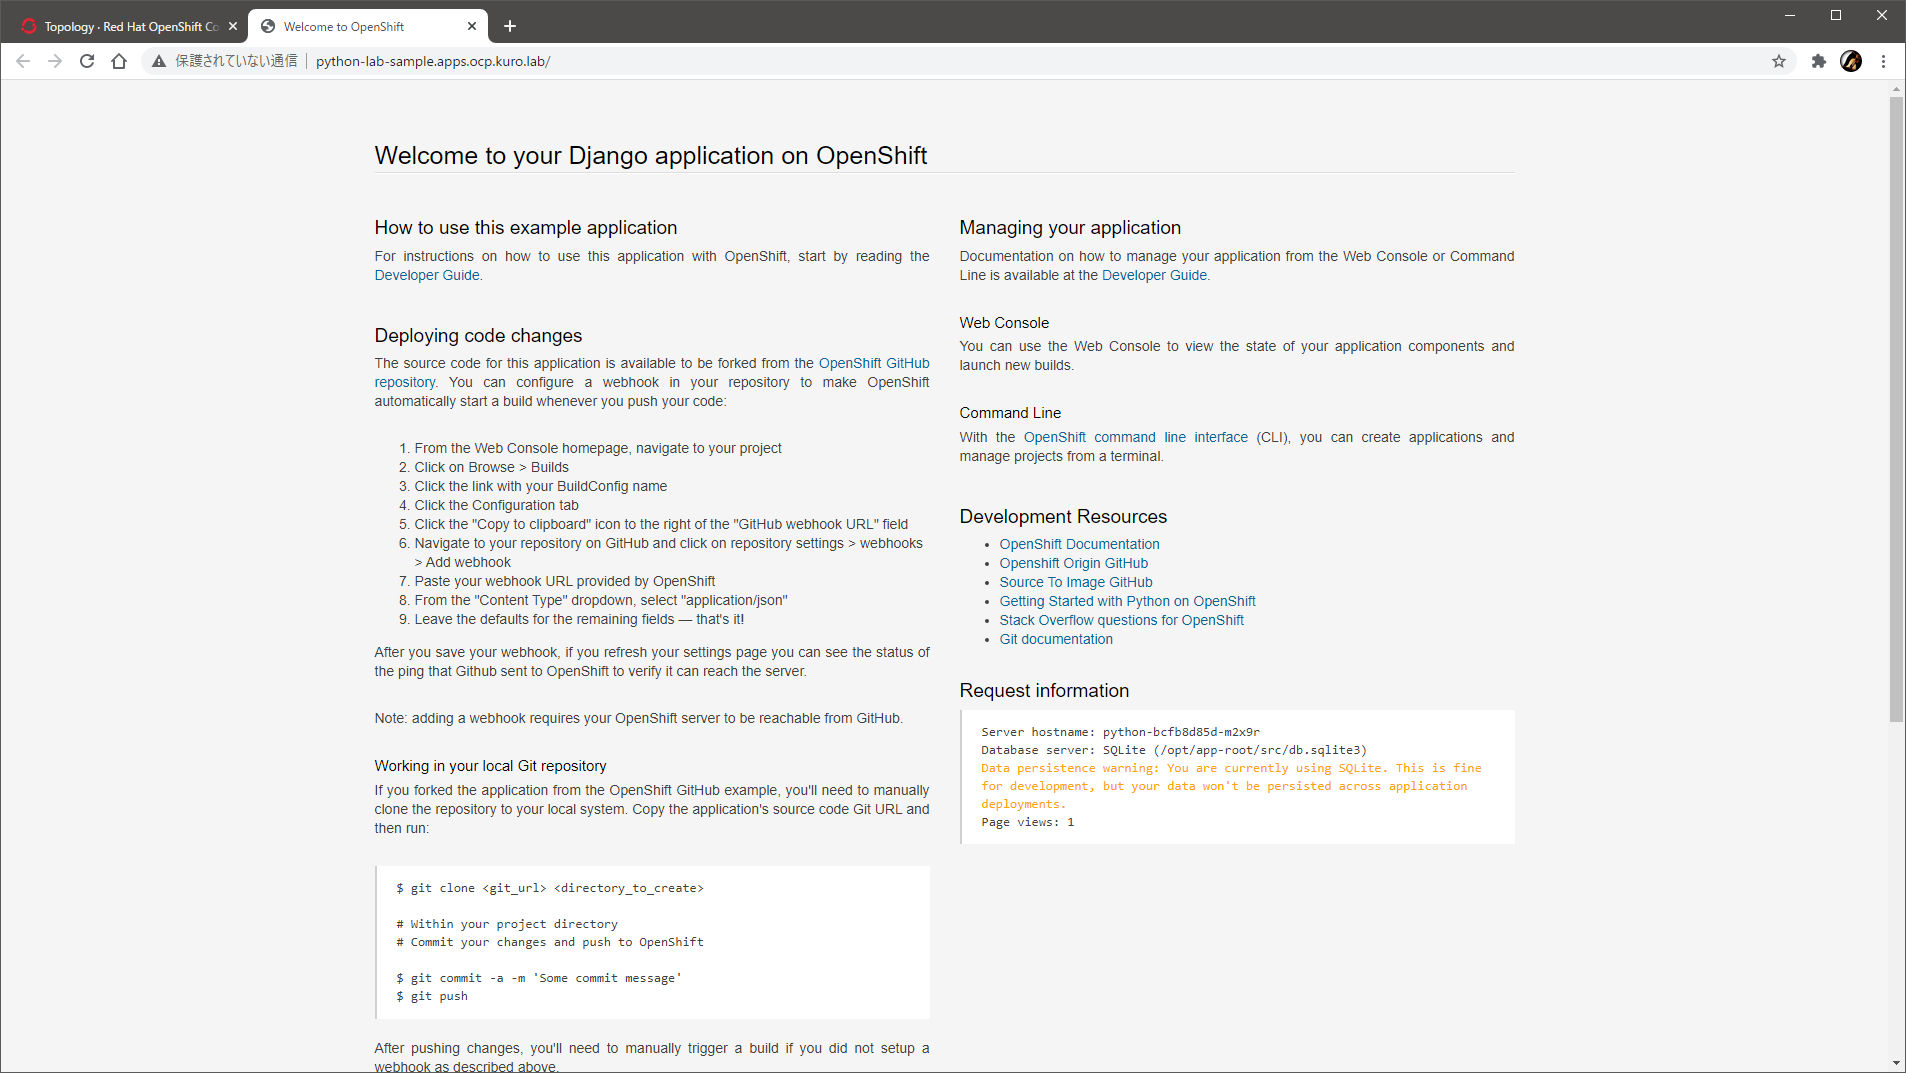
自動でサービスとルートも作られて、無事にブラウザでアクセスできました。
おわりに
最新の OpenShift 4.6 で、ベアメタルホストに対する IPI インストールを試しました。
今回は物理サーバは仮想マシンで代替しましたが、ほんとうに物理サーバを使う場合でも、同様の考え方でインストールはできそうです。最初のインストールだけでなく、物理ホストの追加も相当ラクですし、ノードの停止や起動も簡単なので、比較的柔軟に構成できるでしょう。
また、仮想マシンに対して仮想 BMC インタフェイスを提供できると、こうした物理サーバに対する完全に自動化されたプロビジョニングも仮想環境で気軽に試せて楽しいですね。VirtualBMC for vSphere、ご活用ください。
Thank you, This procedure is useful.
I’m planning to configure DNS/DHCP in provisioning server itself. Hope it works.
I will deploy the same BM IPI installation in this week and update the status
Thanks for the comment, good luck!
Hi Friend,
Im my setup, I see the bootstrap VM came up but interfaces didn’t come up. Hence cluster installation fails.
Do you have an idea?
Starting Network Manager Script Dispatcher Service…
[ 8.149177] IPv6: ADDRCONF(NETDEV_UP): ens3: link is not ready
[ 8.154888] IPv6: ADDRCONF(NETDEV_UP): ens4: link is not ready
Here I use 10.10.10.0/24 as provisioning network and 10.10.10.1 is gateway. Its defined as internal network.
And 10.10.10.2 is assigned to bootstrap which I see in the json files.
Probably there are another message `IPv6: ADDRCONF(NETDEV_CHANGE): ens3: link becomes ready` or similar one a while later. Since the messages are shown just after its startup, usually you can safely ignore those messages. I think there are other reasons why the installation is not proceeding.
The bootstrap VM takes a while to boot up, so you should simply wait, or refer to the troubleshooting guide: https://docs.openshift.com/container-platform/4.6/installing/installing_bare_metal_ipi/ipi-install-troubleshooting.html
I am getting below error any idea what is missing ?
DEBUG libvirt_volume.bootstrap: Creating…
DEBUG libvirt_ignition.bootstrap: Creation complete after 1m59s [id=/var/lib/libvirt/openshift-images/ocp4-pknpq-bootstrap/ocp4-pknpq-bootstrap.ign;f9be20f2-3a89-45c1-aa2a-ea61e7b8d56b]
DEBUG libvirt_volume.bootstrap: Creation complete after 0s [id=/var/lib/libvirt/openshift-images/ocp4-pknpq-bootstrap/ocp4-pknpq-bootstrap]
DEBUG libvirt_domain.bootstrap: Creating…
ERROR
ERROR Error: Error defining libvirt domain: virError(Code=38, Domain=7, Message=’End of file while reading data: Input/output error’)
ERROR
ERROR on ../../../tmp/openshift-install-bootstrap-1131695107/main.tf line 44, in resource “libvirt_domain” “bootstrap”:
ERROR 44: resource “libvirt_domain” “bootstrap” {
ERROR
ERROR
FATAL failed to fetch Cluster: failed to generate asset “Cluster”: failed to create cluster: failed to apply Terraform: failed to complete the change
Hi, sorry for my super late reply…
Ensure that nested virtualization is enabled on the Provisioner VM.
However, because of this KB, maybe it will not work with the recent OpenShift. I’ll give it a try.
https://access.redhat.com/solutions/6959359